If I got to pick a favorite of my projects (thus far) it’s this one. It’s sort of my baby.
I was oogling over the beautiful pallet picnic tables on Pinterest, like this one from Shanty2Chic, and decided, why not? I had pallets, some tools (I’m currently building my inventory of power tools, the sander is the newest edition), and a free afternoon. Well, as free as an afternoon can be with a baby and house work. Anyway, since I did this before the blog I don’t have pictures of the process, so a description will have to do.
First order of business was taking about the pallets. Those things are stubborn! It was during this process of trying to pry them apart with a hammer and large flathead screwdriver that I realized that the next tool I should invest in is a prybar. I digress.
Pallets taken apart, the next thing I did was assemble the top. I made the frame out of some 2x4s that were left in our storarge shed by the previous owners of our house. Screwed in 5 supporting beams spanning the width of the frame and began the puzzle of figuring out where to put the pallet boards which varied greatly in width and length. This took hours! I had never imagined it to be so hard, but maybe that was the perfectionist in me.
The legs were fun to put together. I knew I didn’t want four posts on each corner; too hard to make perfectly even so it doesn’t wobble with the material I had (you never know what your going to get with pallet wood).
Before I go on, I just want to say that I hardly do any measuring or planning when it comes to these projects. It’s usually just put it together as I go, so if your reading this hoping for a tutorial, I can give you some information, but I’m no Ana White. Just wanted to put that out there.
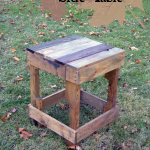
So, the legs…each leg has a bottom and a top peice of the same size. These are where the table and the floor rest. Then there are pallet boards sandwiching a 2×4 piece that was cut to allow the long supporting beam within them. I made the X by cutting 4 boards at 45 degree angles to attach to the top and bottom boards with the vertical “leg” boards.
Then I wedged the supporting beam into the spaces made in the legs, attached the legs to the top, and there you have it!
Check out my facebook page, and don’t forget to hit that lovely little “Like” button if you appreciated this or other posts.
Thanks!


Speak Your Mind