Let me take you to Gulf Shores Alabama where my family vacations at least once every year.
Its beaches are the kind of clean white sand that feels soft in between your toes and the water is a beautiful turquoise blue. When the sun shines, shimmering lights sparkle off the waves that are tame enough to swim in. Gulf Shores does not lack in interesting and amazing wildlife. From dolphins in the coast, pelicans in the air, and alligators in the canals, there is always something fun to see.
Not to mention the shops and restaurants. We always spend at least one day shopping and walking around the town.
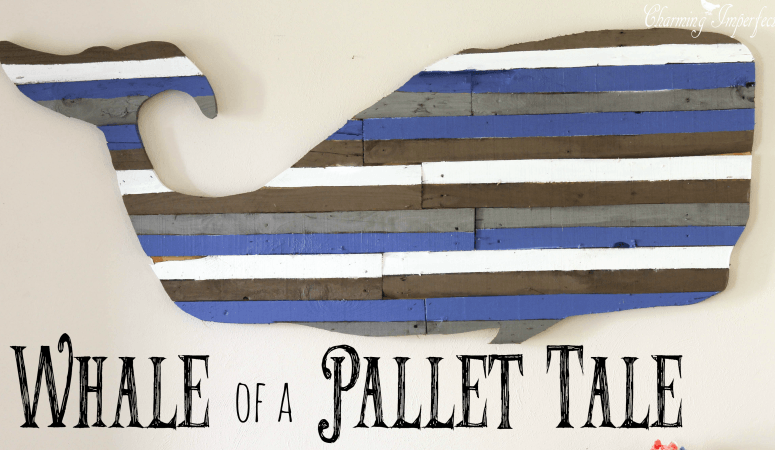
Since my family loves Gulf Shores so much and goes there so often, many of my aunts and uncles have bought condos down there. I’m still waiting for my parents to hop on the bandwagon 😉 (hint, hint Mom!) One of my aunts is currently working on decorating her new condo and asked if I would make some art out of pallets. Of course, I can’t turn a pallet project down and agreed to make her a whale.
So, this post is a whale of a pallet tale and chronicles the adventures of our Moby Dick friend. Be sure to drop anchors and relax in the imaginary (or real, depending where your reading this from) beach sun while I tell ye a swashbuckling yarn.
Avast ye! The materials you need are as follows:
- Two pallets, disassembled
- Sheet of 1/4” plywood (5’x3’)
- Paint (blue, brown, white, grey)
Ahoy! Can’t forget the tools!
- Jigsaw
- Brad Nailer
- 1” nails
- Paint brush
Batten down the hatches, landlubber! Let’s make us a treasure. When complete, this whale will span 5 feet wide and 3 feet tall.
Start yerself off by washing the scum off those pallets and sanding them down.
We painted the wood first because it was something we could get a head start on at night when I wasn’t going to use tools in the dark.
I wanted narrow looking planks and instead of ripping the pallets lengthwise, we just painted each board in half, using tape to make sure the lines were straight as the parrot flies.
When yer ready for assembly, get out a big sheet of plywood for the back. This will ensure stability. Lay your pallet boards down seven wide and two across. Make sure to stagger the edges of the boards. Also, make sure you face the painted side down.
Put the plywood over your upside down boards and nail’er down.
Next, what I did was free hand the whale shape on the back of the plywood. Whales are fairly easy to draw, but mighty hard to spot if you don’t know where to go on the deep blue!
X marks the spot! Follow that line you just drew with yer jigsaw all the way around the whale. Sharp corners are tough, but you can do it!
Thar she blows! When the cuts are done, flip ol’ Moby around and stand in awe of your artwork!
I couldn’t be more pleased with how he turned out. I think there is an element of whimsy without being too silly looking. He’s got class and charm and is going to look awesome in my aunt’s condo. She is taking him down at the end of this week and promised pictures, so I’ll be sure to post them when she does.
Aye, for a scallywag, ye sure do know your way around the ol’ poop deck and wield a jigsaw like no pirate I ever did see with my one eye.
Thanks for dropping anchor here at Charming Imperfections to read about my whale of a pallet tale. Now set sail and go make some art, but before ye leave, be sure to follow my Periscope page: @charmimperfect.
I love your adorable whale!
Thank you Kathy!
Love it! My daughter made me a whale out of string art and I have another in my living room! This one would be perfect with the rest of my decor! I will be pinning!
Pamela Smith recently posted…NOW ON FRIDAYS! CORNER NEWS!
Thank you Pamela! There is something about whales that make a great decor piece, isn’t there?
I love this!! If I ever have a boy I really want to do a nautical theme and this would be adorable in the room! Thanks for the great tutorial!
Ruthie recently posted…Adding Color to Your Space
Ruthie, a nautical boys room would be SO CUTE! I love that idea!
This is absolutely adorable! You make it look so easy!
Thank you so much!