• Home
  • About
    • Comment Policy
    • Disclosure Policy
    • Privacy Policy
  • Advertise
  • Contact
  • Archives
  • Stay at Home Mom
    • Stay at Home Survival Kit 2 Countdown
    • Affiliates
    • 
    • 
    • 
    • 
    • 
    • 

Charming Imperfections

DIY, Gardening, Parenting, Money Saving, Blogging

  • Charming Imperfections
  • Home
  • DIY
    • Crafts
    • DIY Decor
    • New Construction
    • Reclaimed Pieces
    • Room Remodels
  • Faith
    • Bible Study
    • Encouragement
    • Inspiration
  • Gardening
    • Harvest and Storage
    • Plants
    • Tips and Tricks
    • Tutorials
  • Mommyhood
    • Tips
    • Housekeeping
    • Kids
    • Marriage
    • Money Saving

Shabby Chic Tool Crate DIY

I am a Fixer Upper fanatic. I love that show, and when I saw this adorable tool crate turned to planter on one of their episodes I had to have it! Not being one to spend money on decorating (as I know so many of you are), I set my mind to making it.

Life is Just a Tire swing Fixer Upper Tool crate

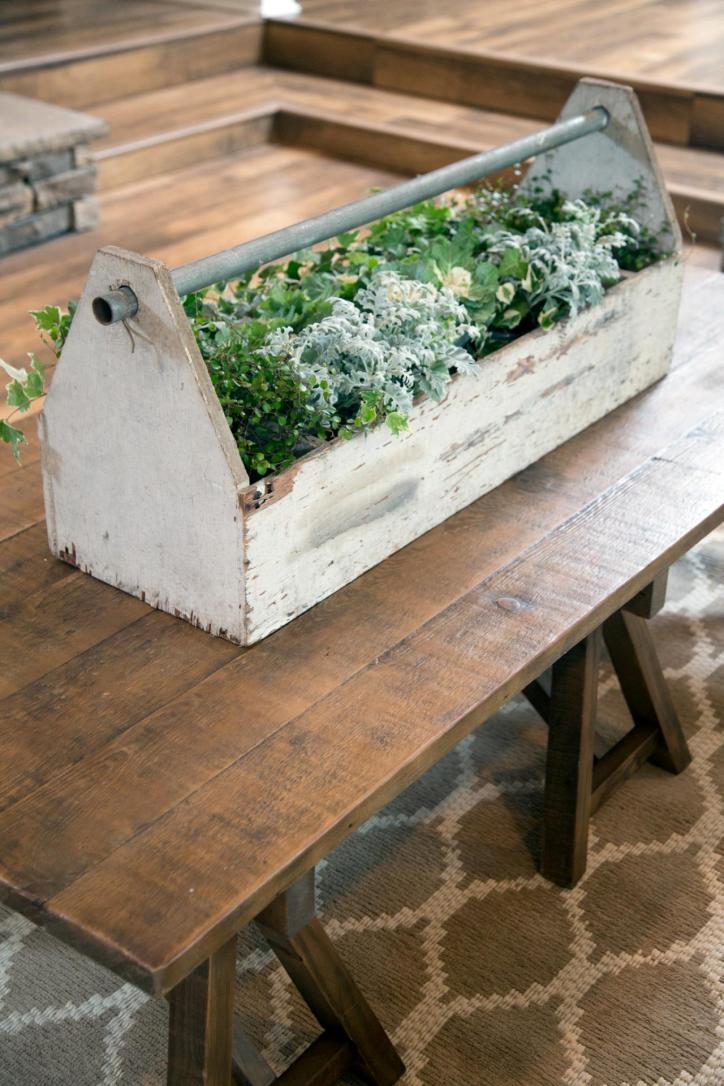
What I love about this shabby chic tool crate decoration is the essence of repurposed things. I just see a picture of an older man fixing things around his farm with calloused hands and tanned skin keeping his rusty but reliable tools this crate. Then, no longer needed for its original purpose, the tool crate was given a new life and character by becoming the centerpiece decoration in a home. While that isn’t the story of this tool crate, it doesn’t mean the idea isn’t implied.

So, let’s get our tools out and make this beauty, shall we?

The materials I used were random scraps lying around our home, but if you aren’t so fortunate as to have these freebies here is your shopping list (the links below are affiliate links indicated by a *):

  • A 3 foot section of Galvanized Pipe*
  • 12 foot 1×6 cut into four 3 foot sections
  • Section of 1×12 (at least 4 feet long)
  • 1 1/2” screws
  • Circular Saw
  • Hole Saw*
  • Power Drill
  • Paint

You shouldn’t have to spend more than $20 (not including the power tools). This project took about 2 hours to complete.

Step 1: Gather your materials

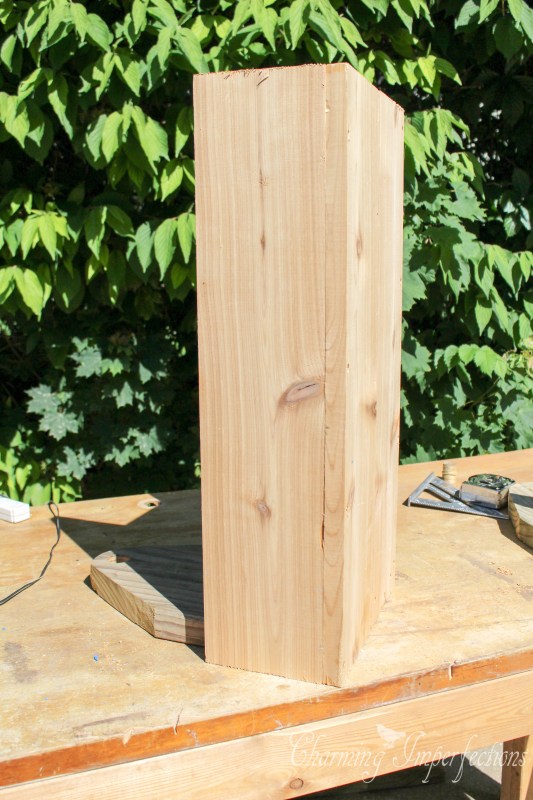
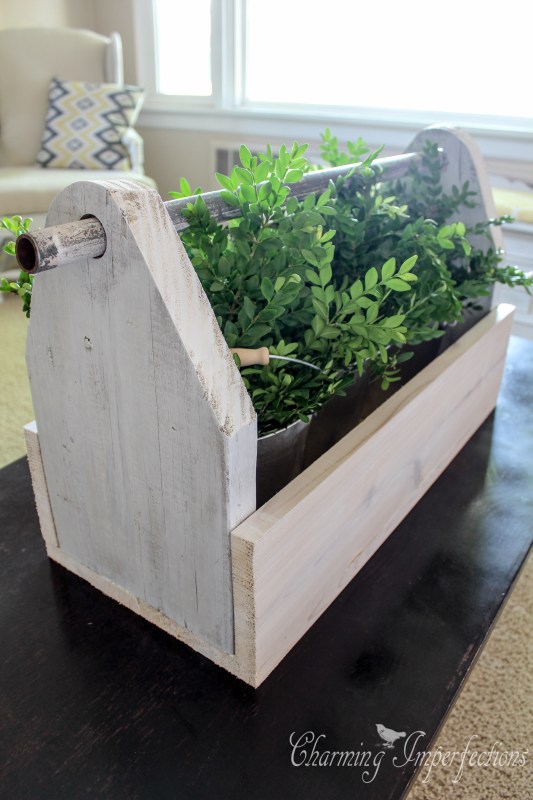
Step 2: Draw and Cut your end pieces

I didn’t measure anything here and sort of wish I did. If you would like to be more precise, then measure 6 inches up the 1×12 board from the bottom and start your angle there. Also find the center of the top, measure and inch in each direction. Take a ruler and match it with the six inch mark to one side of the center mark and draw a line.

Inspired by Joanna Gaines, this shabby chic tool crate is an easy DIY and will bring charm to your living room. Get the full tutorial here!

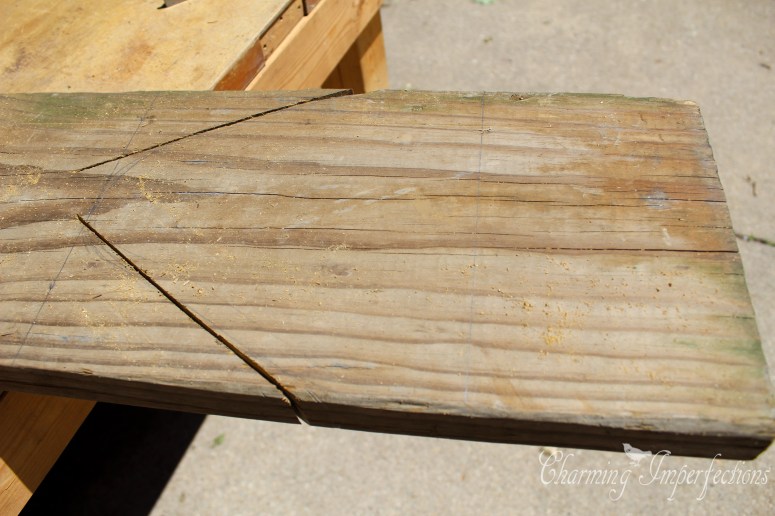
That was a long explanation of how to draw a triangle wasn’t it? Anyway, go ahead and cut those end pieces out.

Inspired by Joanna Gaines, this shabby chic tool crate is an easy DIY and will bring charm to your living room. Get the full tutorial here!

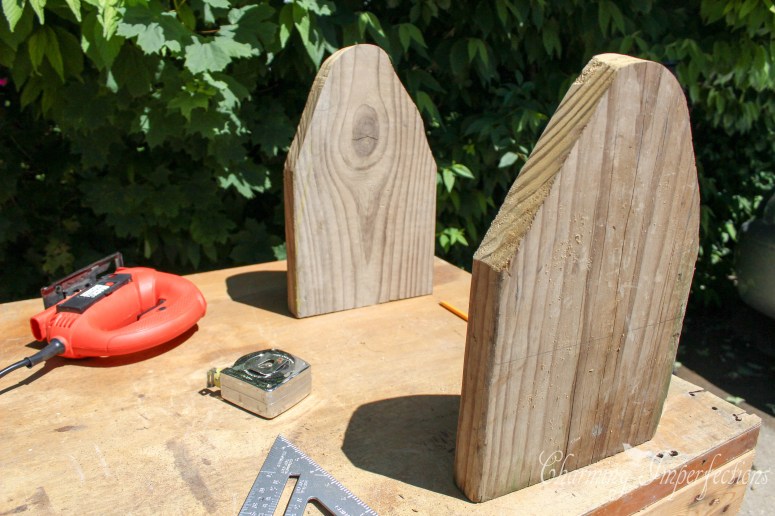
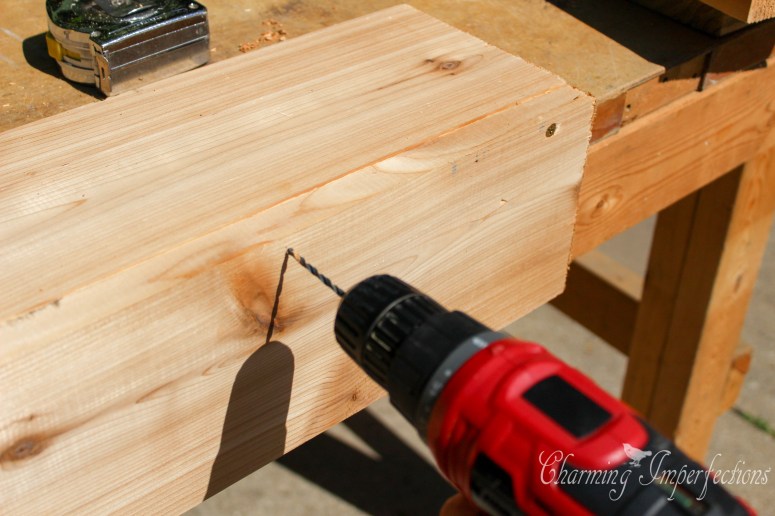
Step 3: Drill Holes for the Handle

This is where your hole saw comes in (which is basically a big drill bit). This took more time than I thought it would, probably because of the quality of my saw against the toughness of the wood. Make sure your hole saw is the right size for your pipe.

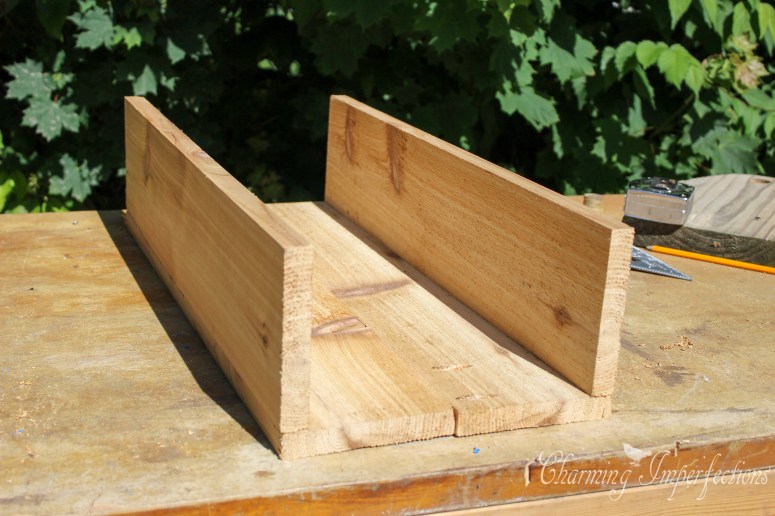
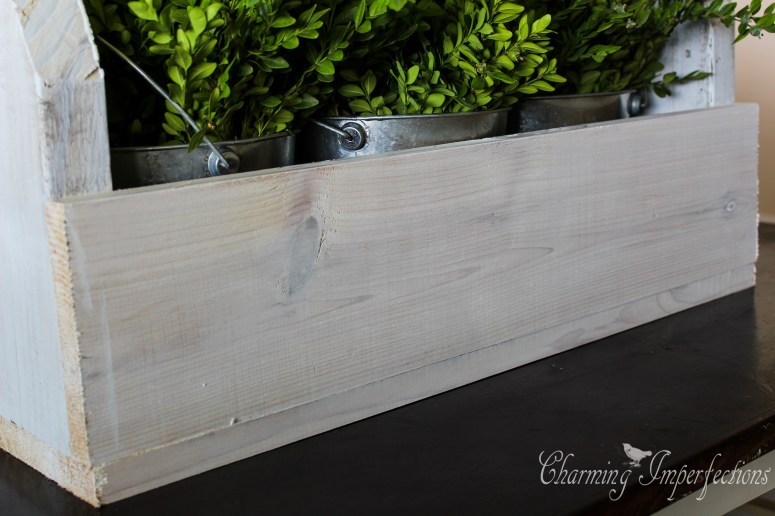
Step 4: Build the Crate

If you haven’t cut your 1×6 into four three foot sections do so now. Obviously if your pipe is longer or shorter than 3 feet you will have to adjust your cuts and shopping list.

Assemble the crate by the corners. I used the edge of my work bench as a guide and screwed together the left side and bottom pieces and the right side and bottom pieces.

Inspired by Joanna Gaines, this shabby chic tool crate is an easy DIY and will bring charm to your living room. Get the full tutorial here!

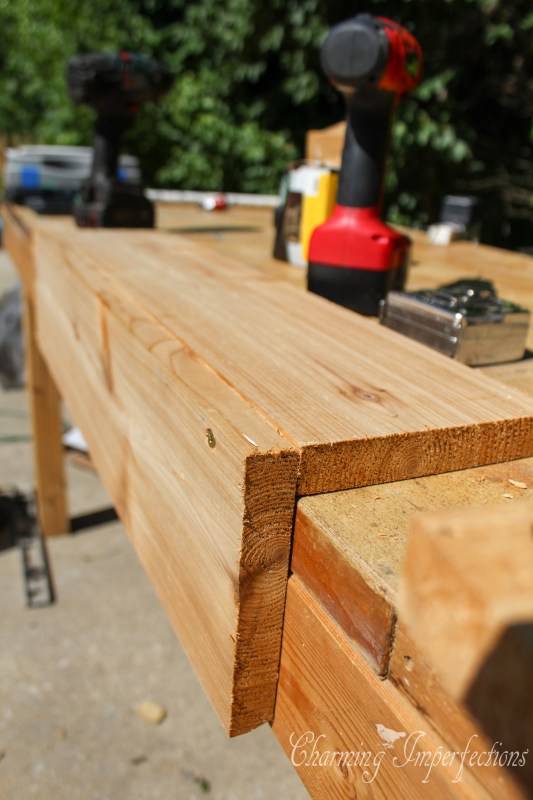
Be sure to pre-drill the holes if your wood is brittle.

Inspired by Joanna Gaines, this shabby chic tool crate is an easy DIY and will bring charm to your living room. Get the full tutorial here!

These will come together by the end pieces later.

Inspired by Joanna Gaines, this shabby chic tool crate is an easy DIY and will bring charm to your living room. Get the full tutorial here!

Step 5: Attach the end pieces

Ok, did you drill the holes into the end pieces? Both of them? I got to this step and had done one but not the other, which isn’t too big of a deal.

The easiest way to attach the end pieces is to put the whole thing onto its side with the end board you are attaching on the bottom.

Inspired by Joanna Gaines, this shabby chic tool crate is an easy DIY and will bring charm to your living room. Get the full tutorial here!

That way, you know it will be flush with the ends of the other boards. Pre-drill and screw your screws into the bottom of the crate so they won’t be seen.

Step 6: Slide in the pipe
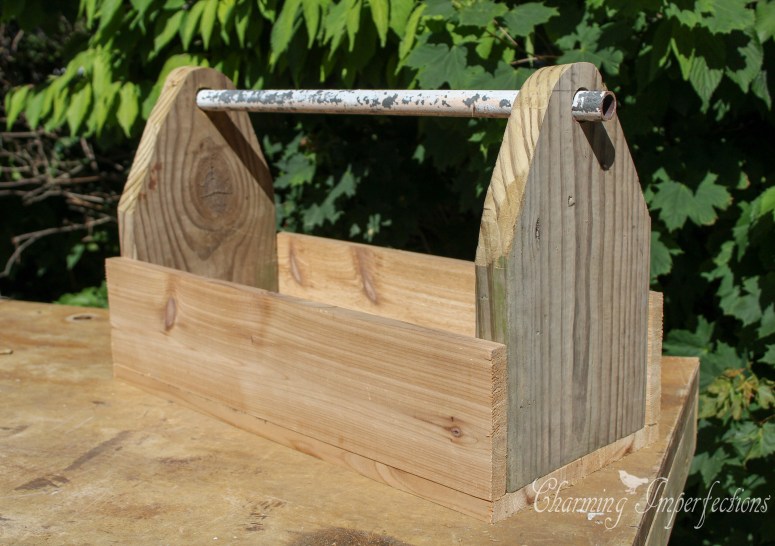
Inspired by Joanna Gaines, this shabby chic tool crate is an easy DIY and will bring charm to your living room. Get the full tutorial here!

Step 7: Paint

I used the same white wash method used on this desk. It’s super easy, dries fast, and gives a really cool distressed look in the end. Remember, less is more using this method!

Inspired by Joanna Gaines, this shabby chic tool crate is an easy DIY and will bring charm to your living room. Get the full tutorial here!


Inspired by Joanna Gaines, this shabby chic tool crate is an easy DIY and will bring charm to your living room. Get the full tutorial here!

Inspired by Joanna Gaines, this shabby chic tool crate is an easy DIY and will bring charm to your living room. Get the full tutorial here!


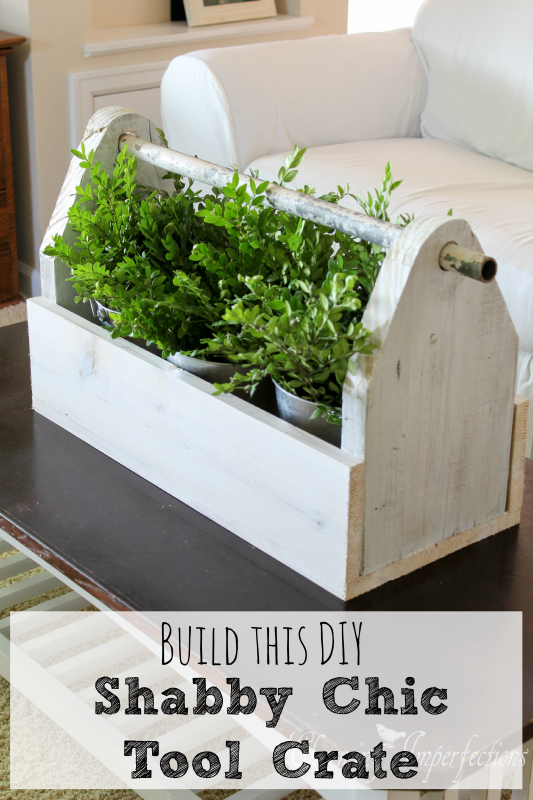
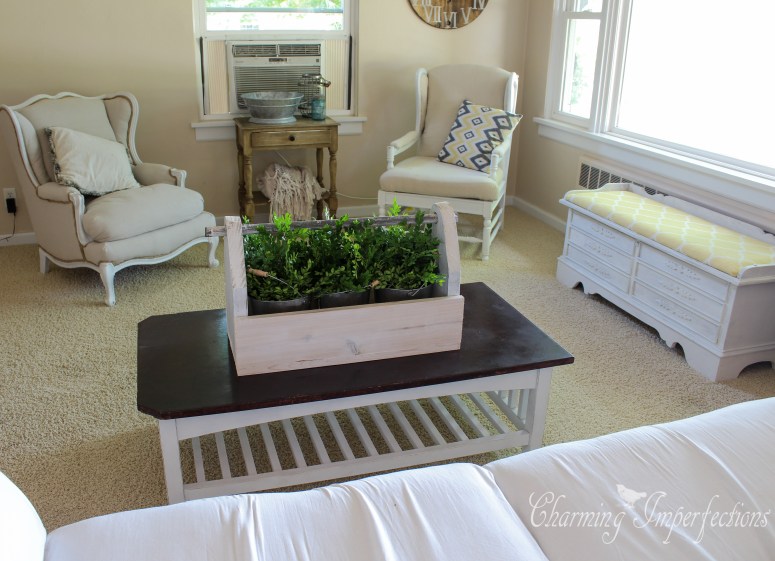
The rustic look of the Magnolia Homes is astonishing. I ooh and ahh over every episode and aspire to replicate the look in my own home. Now that I have this tool crate inspired by Joanna Gaines herself, I feel one step closer to that dream. For the longest time our living room was not working for me, now that I’ve added some reupholstered chairs and this shabby chic tool crate, it’s taking on a brighter and more welcoming feel.

Inspired by Joanna Gaines, this shabby chic tool crate is an easy DIY and will bring charm to your living room. Get the full tutorial here!

You can make this tool crate too by following this tutorial. It is an easy level project that cost about $20 and takes about 2 hours to make. You will love the character and charm it brings to your home!

**Or, you can buy this beautiful Shabby Chic tool crate by visiting my shop page!

If you have any questions regarding this or any other tutorials please don’t hesitate to ask! Have a lovely day friends!

Please check out my 2015 reader survey and enter to win a $10 Amazon Gift Card when you’re finished.

Share this:

  • Facebook
  • Pinterest
  • Twitter
  • Google
  • Print
«
»

DIY, DIY Decor, New Construction 2

Featured Post

Comments

  1. Kendra @ www.joyinourhome.com says

    July 16, 2015 at 3:43 pm

    Awesome job, Rebekah! It totally looks like it could be 100 years old… Love the distressed look! Your living room is looking lovely!

    Reply
    • [email protected] says

      July 16, 2015 at 9:22 pm

      I’m so glad you said that, it’s totally what I was going for :)

      Reply

Leave a Reply Cancel reply

Your email address will not be published. Required fields are marked *

Meet Rebekah!

Country girl, DIY enthusiast that is loving life's imperfections Read More…

Featured Posts

Mason Jar Herb Garden

DIY Chalkboard Mail Sorter

How We Funded Our Vacation Using Credit Cards

DIY Farmhouse Table with 2 Leg Options

Feminine WordPress Themes using the Genesis Framework by Restored 316

Pin With Me!

Visit Rebekah@Charming Imperfections's profile on Pinterest.

What’s Up on Hometalk?

Image Map


Disclosure

Affiliate links are used throughout this site. They provide a small commission at no cost to the buyer for products purchased through that link. They are always noted by an (*).

Sponsored posts mean I receive a free product or compensation for the post by a company.

I value honest above all else and will never recommend a product that I don't already love. I always provide information about products and services to benefit the reader.

Copyright

I appreciate it when you share the content on this blog, but please remember that all images and text are property of Charming Imperfections. While you may use photos on this site, it is requested that you link back to the original post and do not remove any watermarks, crop, or edit any photo without my written permission. Pinning is always welcome and appreciated. Thank you!

My Latest Photos

Sharing our #cozy living room for #lmbloves this week. We live all our farmhouse pillows and slipcovered sofa and the big wood coffee table is perfect for putting up our feet and watching the cows from across the street. @lizmariegalvan
rebekah_eva
8
3
This Antique was lovely just the way I found it but needed some cleaning and paint. It's on the blog today! You're not going to believe how much I bought it for.
rebekah_eva
4
0
What do you like about this bathroom? My vote is the shower curtain. Great design @whimsygirldesign!
rebekah_eva
4
0
What can you do with Mason Jars? We made a light fixture that is just wonderful in my opinion! Search "Mason jar chandelier" in Charming Imperfections to see the updated post :) #rusticdecor #repurposed
rebekah_eva
17
2
After a long day in the kitchen putting together 21 freezer meals its nice to have such a pretty outdoor space to retreat to and put up my tired feet. #livelikenoonelse
rebekah_eva
10
0
This bookcase has made such a difference in our living room decor. I love it! Is there something in your house that's been a game changer piece?
rebekah_eva
7
0
We moved into this cottage about a year ago and are still just as in love with it today as we were the first day we saw it. It has all the charm and craftsmanship of a 1950s home. Sharing for the #homesfullofheart theme!
rebekah_eva
19
1
I'm sharing all our budgeting secrets in a four part series on the blog starting tomorrow. You won't believe what we are making it on while living like no one else. #livelikenoonelse @daveramsey
rebekah_eva
5
0
Showing off theses painted beauties today with their grain sack upholstered seats as part of the #lmbloves theme. This is where I usually sit to sort through mail or sip coffee in the morning because it s so light and comfy! @lizmariegalvan
rebekah_eva
15
0

Subscribe and Be Awesome!

Copyright © 2015 · Darling theme by Restored 316