Looking back on the five months I’ve been blogging, I can see where I’ve learned a lot in certain aspects. One of those aspects is in my photography, specifically in editing. If you are a blogger you’ll know how crucial a good picture is for your post. I’ve been using Picmonkey* for a lot of my editing, and it has been a game changer for me. I love how easy it is to use and how many cool extras they give to you like fonts and overlays!
While Picmonkey does provide a lot of wonderful features, there are a few things I’ve had to do a little extra playing around with to get what I wanted. It’s taken a lot of trial and error, so I wanted to share those tricks with you to save you from time and stress.
Number One: Centering Text
This may not be that great of an idea, but it was definitely a lightbulb moment for me, so it’s worth sharing. If you have a great picture and want a title to run across the middle of it, you’ll find some difficulty in getting it perfectly centered because Picmonkey doesn’t have rulers.
The solution is quite simple. Highlight your text and select the center button.
Then stretch the sides of the text to the edges of the photo and it will be perfectly centered.
You can also use this trick to center words inside an overlay by stretching the sides to the edges of the overlay.
Number Two: Add Style to Overlays
Another thing I like to do is to layer overlays to give them a little extra style and interest. To do this, start with your favorite overlay, change it to the color of your desire, and fade it by sliding the slider until you are satisfied. I tend to make this first layer lighter to contrast the next.
Right click on the overlay and duplicate it. Then, resize it to be just a tad bit smaller than the first and place it on top.
The result is this really cool border. You can play around also play around with colors to emphasize that border. **Bonus tip: Do this with text to get a shadow effect!
Number Three: Window Blow Out
Now, I can’t take credit for figuring this one out, but it’s so cool that it’s totally worth sharing. The genius behind this trick is Jen from The Chronicles of Home. Check out her blog to see the full tutorial. Here are the results:
Be sure to pin the image from her blog to give her the credit for this awesome trick.
Number Four: Lines and Arrows for Tutorials
When I was editing the pictures for my re-upholstered chair tutorial, I was having trouble explaining the steps with mere words. With such a complex process, I needed a way to clearly indicate which parts of the chair I was writing about in the steps. That’s when I found the “dashed and lined” overlay section in Picmonkey.
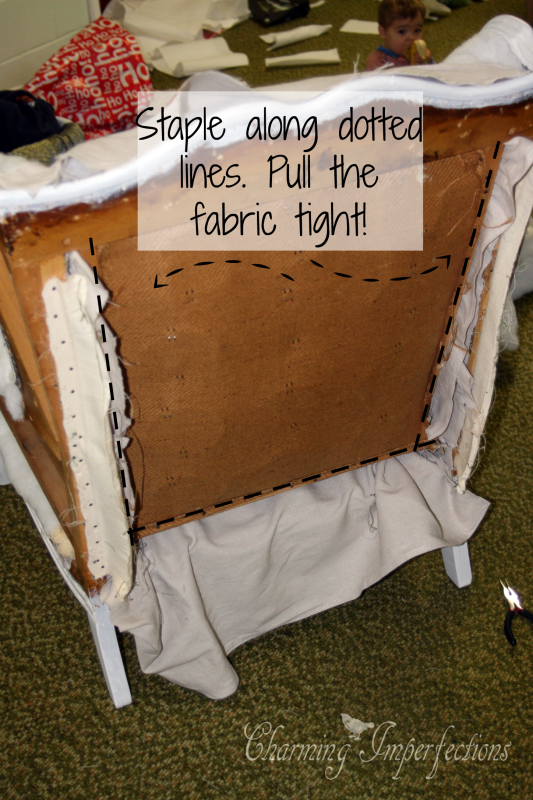
When you pick out which lined overlay you want to use, resize it to fit the area you wish to emphasize and rotate it to follow the direction of correctly.
Arrows leave the reader no room for questioning what you are trying to indicate.
Number Five: Playing with Angles
Sometimes I like to angle the words or overlays I put onto a picture just to make it more interesting to look at. This can become troublesome, again, because Picmonkey doesn’t provide rulers. Maybe I’m just picky, but if something is going to be angled, it has to be perfectly square or else it bugs the daylights out of me!
Start by selecting the plain square overlay and change the colors so only the border is showing (turn “color 1″ to black and “color 2″ to transparent)
Move the box into the corner or area that you want your angled overlay. Now, use those perfectly square corners of the box you just made to angle your overlay just perfectly by adjusting so that it matches in the two opposing corners.
Delete the box and you have a beautifully symmetrical label on your graphic.
Those are the tricks I use most regularly. It’s amazing what you can do with this simple online photo editing tool. Now, you’ll notice some of the overlays and fonts I used in this post were part of “Royale” features. If you are wondering whether it’s worth it to get; I think it is. Your photography is an investment and this is a small cost compared to most upgrades when you consider all the extra features you get. Can you get by without it? Yes, and you can do quite well, but I’ve found it to be totally worth it.
I hope these Picmonkey tricks are helpful to you! What are some things you’ve learned using this amazing program? I’d love to hear about them! Comment below!
Great job! There is a wonderful tutorials section the PicMonkey blog and I’ve learned to use so many tools (mostly because I’m horrible at actually taking the pictures)!
Thanks for this collection of tips!
Sarah Nenni Daher recently posted…Easter Bath Bombs